Showing posts with label home. Show all posts

Monday, 4 February 2013

Number 25: 'DNA' diffraction with a spring and a laser pointer

Photo 51
Time for my second DNA post and I thought I'd take a look at the data that allowed Watson and Crick to work out the famous molecule's structure.

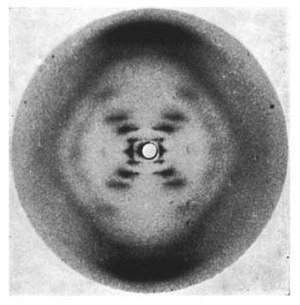
The crucial bit of information came from a photo taken by Rosalind Franklin and Raymond Gosling.  The image is now quite famous and is known as photo 51.

But photo 51 doesn't much look like a picture of DNA. And thats because it is in fact an X-ray diffraction image taken by shining X-rays at a crystal of DNA. Its a bit of a leap from the photo to the DNA structure but luckily there's a really easy way to demonstrate how an image like this comes from a helical structure.

You'll need:
    - a retractable ball point pen
Safety:
Adult supervision required here. Be careful with the laser and don't shine it in anyone/anythings eyes.

What to do:

1) Unscrew the pen and remove the spring. The spring is of course a helix, so its going to act as our model for DNA.

2) Shine the laser through the spring, and then onto a white wall or card about 3 meters away. Best to do this at night with the lights dimmed.

You should see an image on the wall that looks a lot like this.


Which also happens to look a lot like photo 51. And that's because the same processe generates both images.

What's going on:
Both photo 51 and the cross you've just made on the wall are formed by a process known as diffraction. To explain what that is we need to remember that light is a wave.  Now imagine two waves meeting each other. If the waves overlap so that he peaks are in the same place then they combine and the result is a wave that is twice as high. But if the peak of one wave meets the trough of the other they cancel each other out, and in the case of light you get a dark spot (you can also see this happening if you shine the laser at a CD). So some of the laser light that diffracts off the spring interferes with other waves of light giving you a cross and the spots. And from the distance between the spots and the angles of the cross you can work out the shape of the spring (or DNA).

Exactly how its done is explained very nicely here.

And a hat tip to Suzie Sheehy who told me about this fab demo.

Monday, 26 November 2012

Number 22: Burning steel

What do you need to make stuff burn? Just three things, oxygen, a energy source to get it all started and some fuel. These three things are there every time you light a candle or start the engine of a car. The candle wax (or petrol) is the fuel, the match (or a spark) gets is all started and the whole thing is kept going with the oxygen in the air.


So what else can we get to burn? How about steel?

Steel is mostly iron mixed with some carbon and sometimes, other metals (depending on what the steel will be used for) and its not something you'd normally think burns.

You'll need
Safety
This reaction generates a lot of heat (chemists call it an exothermic reaction) and can throw out sparks so make sure there is nothing near by that might catch fire. Have a bucket of water or fire extinguisher handy.  You can also end up with some small particles of steel wool being chucked up and you don't want to get them in your eyes, so wear safety goggles. Make sure there is a responsible adult supervising. Finally, because you get some smoke and sparks produced you should do this outside, you don't want to set fire to the kitchen.

What to do:
1. Fluff up the steel wool a bit. This is to make sure there is plenty of air in amongst it all.
2. Put the wool on the tiles (or whatever it it you are using)
3. Touch the terminals of the battery to the wool.


Almost instantly you'll see part of the wool glowing red hot, very quickly this spreads through the whole clump of wool, consuming it all. Like this:


What's going on:
When you burn things with carbon in them (these are known as organic compounds), like candle wax or fuel in the car, you are reacting the carbon with oxygen to make carbon dioxide gas (which has the chemical formula COmeaning 1 carbon and 2 oxygens). But in this case there isn't any carbon to burn nor are we lighting anything with a flame. Instead the electricity from the battery runs through the steel wool and heats it up. This happens because the electrons and ions that form the electricity collide with other particles that make up the steel wool making them move around, and heat is just the result of particles (like atoms) moving.

The heat speeds up the reaction between the iron in the wool and the oxygen in the air. This would happen anyway, without your help, just much slower (that's why things rust). And this reaction produces heat (its exothermic) which kept the reaction going until you run our of fuel (i.e. the steel wool).

When you burn candles or wood you don't end up with much left over. That's because carbon dioxide is a gas, so it floats away. But when you burn steel wool you end up with iron oxide which is a solid, hence the black stuff that's left over. One more thing,  the chemical formula the iron oxide is Fe2O3 ie. 2 iron atoms (which have the chemical symbol Fe) react with 3 oxygens.

Tuesday, 30 October 2012

Number 21: Halloween slime

Halloween is almost here and so it is time for some messy mayhem! Time to roll out the classics, cornflour slime! All in funky comic book format.

I love playing with this stuff, its sooo simple and so much fun. OK it makes a bit of a mess, but it's only flour. Plus it doesn't splash, try making a big bowl of the stuff and then hitting it.

What to know more?

The cornflour water mix creates something called a non-Newtonian liquid. Basically, when you shock the liquid it turns to a solid. Ketchup is another example, that's why hitting the bottom of the bottle to get it out doesn't help much. It turns out this is really useful effect (not the ketchup), some bullet proof vests use the same principle and someone has even suggesting filling pot holes with this cornflour mix. 

Sunday, 7 October 2012

Number 20: Black Worms

Firework season (in the UK) is approaching so I thought it would be fun to find a simple homemade pyrotechnic. And here it is, 'black worms' made with stuff you're bound to have around the house.


You'll need:
  • Icing or powdered sugar (if you haven't got any already then just wizz some granulated sugar in a food processor).
  • Bicarbonate of soda
  • A pot of sand
  • An alcohol based handwash gel
  • A pot and a teaspoon
  • Matches or a lighter
Safety: 
We're using flames and flammable materials so this is best done outside and with adult supervision.

What to do:

1. Mix 2 teaspoons of icing sugar with 1/2 teaspoon of bicarbonate of soda.

2. Make a small depression in the sand and then spoon the sugar/bicarb mix into it.

3. Squirt the handwash gel all the way around the pile of the sugary mix.


4. Light the gel and watch the snakes grow!


What's going on?

The handwash gel contains ethanol which burns pretty well. This heats up the bicarbonate of soda, which gets converted to carbon dioxide, sodium carbonate and water. Meanwhile some of the sugar starts to burn i.e. it reacts with the oxygen in the air, and ends up as more carbon dioxide and water plus  a whole load of stuff that comes form sugar that didn't burn completely. This is what causes the carmel smell and black sooty stuff.  Then all that carbon dioxide forms bubbles in the caramelised sugar and sodium carbonate which causes it to rise up as those little worm like towers.

Sunday, 23 September 2012

Number 19: The greenhouse effect in a bottle

The news is full of stories about climate change and the greenhouse effect. We're told that the carbon dioxide building up in the atmosphere is resulting in the planet warming. Despite all the overwhelming evidence that our planet is heating up (just look at the amount of Arctic sea ice that melted this summer)  some people are still skeptical. And so here is a demo to prove to yourself and anyone else that wants to watch that  carbon dioxide is most definitely a greenhouse gas.


You'll need:
  • 2 x 2 litre plastic bottles (these need to be identical) and 1 smaller plastic bottle.
  • 2 thermometers.
  • 3 corks or rubber bungs, that fit snuggly into the necks of the bottles.
  • 2 lamps fitted with 100 Watt light bulbs.
  • Some vingar
  • Bicarbonate of soda
  • A length of tubing.
  • A drill


What to do:
1. Drill a hole through the middle of each cork. Then carefully push the thermometers through two of them. They need to be a tight fit. Put one of the thermometers, mounted in a cork, into one of the 2 large plastic bottles.

2. Connect up the length of tubing to the third cork. If this is proving difficult then push the empty sheath of a ball point pen through the hole and then connect the tubing to it.

3. Put the other end of the tube into the second large bottle.

4. Now take the small bottle and spoon in 3-4 teaspoons worth of bicarbonate of soda.

5. For this step you need to be quick. Pour 200ml of vinegar on top of the bicarb, then quickly push the cork thats attached to the tubing onto the bottle.  Gently swirl the vinegar/bicarb mix until it stops bubbling. 

TIP: IF you can't get the cork in quickly enough, then try wrapping the bicarb up in some toilet roll. Then push the bundle into the bottle, before pouring on the vinegar.

The bicarb and vinegar react to form carbon dioxide gas. This gets pushed up and out of the tubing into the second bottle. Carbon dioxide is denser than air so it then settles in the bottom of the large bottle.


6. Now cork the large bottle with the other thermometer.

7. Take the two lamps and put them equal distance from a bottle.

8. Turn on the lamps and watch the temperature of the bottles rise. 

9. The bottle containing carbon dioxide should get hotter quicker. I saw a 5 degree centigrade difference after about 10 minutes.
 

TIP: You need to make sure that appart from their contents the bottles are identical. Have them the same distance from the lamps and make sure the thermometers are the same depth in the bottles.

What's going on?
The gases in the bottle are transparent, that much is obvious, after all we can see through them, and we can't tell the difference between the carbon dioxide and air bottles just by looking at them. But the gasses in the bottles are only transparent to visible light.  If you could see in infrared then you'd notice that the carbon dioxide bottle blocked out more of this light than the bottle containing just air. Heat can be transferred via infrared light. So as the carbon dioxide absorbs the infrared light it heats up. And the same thing is happening to our planet.

Friday, 10 August 2012

Number 18: The bottle rocket

Rocket science isn't exactly brain surgery. A few odds and ends and a bicycle pump is all you need to build a pretty impressive rocket.

Safety first:
The rocket can take off with quite a bit of speed.

  • Make sure there is a responsible adult present.
  • Don't point the rocket towards any people or animals.
  • When you launch the rocket make sure it's pointing away from you.
  • Launch the rocket where there is plenty of space for it to come down. A playing field is ideal.


You'll need:
  • An old bicycle inner tube.
  • A cordless drill.
  • An empty soda bottle.
  • A cork or bung that fits snuggly into the bottle.
  • Sticky tape.
  • Drinking straws.
  • 4 wooden skewers.
  • A bit of thin card.
  • A pump (a foot pump or track pump will do nicely).
  • Scissors

How to build it:

1. Cut the valve out of the inner tube. Trim off the excess tubing from around the valve.


2. Drill a hole through the cork.

3. Push the valve through the hole in the cork. It needs to be a tight fit, so you might have to tap it in with a mallet.


4. Cut the drinking straw into 4 bits. Fold over one end of each bit of straw. Tape them to the bottle with the open end pointing towards the neck of the bottle. 

5. Make a nose cone from the card and tape it to the bottom of the bottle.


6. Pour water into the bottle until it's about 1/4 full.

7. Push the cork into the bottle.


8. Attach the pump to the valve.

9. Stick the skewers into the ground and slide the straws onto them  so that the rocket is resting on the skewers.


10. Make sure the rocket is pointing away from you then start the countdown and get pumping!

These are 3 successive frames from a movie shot at 30 frames per second. So you can see the rocket launches pretty quickly!

What's going on?

The physics involved here is really quite simple. The same principles apply as with the film canister rocket. In that case we had a container that filled up with gas as a result of a chemical reaction. With the bottle rocket the pressure build up is caused by you pumping air in. Eventually the pressure gets too great and the cork pops out. The air pressure then forces the water out, the action of the water moving down and out of the bottle in turn propels the bottle upwards.

It's another great example of Newton's 3rd law of motion which states: "To every action there is an equal and opposite reaction". So in this case the action is the water being forced out of the bottle, and the reaction is the rocket shooting off.


Thursday, 5 July 2012

Number 15: The 'impossible' balancing forks


Here's a trick that just looks impossible. Even when you know what's happening it just doesn't look right.


You'll need:
  • 2 identical forks
  • Cocktail sticks or toothpicks
  • A glass
  • Matches
Safety:
Matches are involved so get adult supervisions.

What to do:
1. Lock the tines of the forks together.
2. Jam a cocktail stick through between the tines of the fork so that is sticks about 1 cm out the back.
3. Pick up the forks and place the cocktail stick over the rim of the glass with the handles pointing in towards the glass. Find the spot where the forks balance. 

This already looks pretty amazing. But it gets better!

4. Now light the end of the toothpick thats pointing towards the inside of the glass. 


So what's going on?
It just looks all wrong doesn't it? But the explanation is really quite simple. Half the weight of the forks is in front of the rim of the glass and the other half is behind the rim of the glass. So everything balances nicely.   Sometimes physics just doesn't look right.

Sunday, 17 June 2012

Number 14: Elephant's toothpaste

Here's a great example of biochemistry in action.

You'll need:

  • A bottle of hydrogen peroxide. You can get this from most pharmacists. Try and get 9%, but 6% will do.
  • Dried baker's yeast.
  • Washing up liquid.
  • An empty plastic bottle (500ml or so).
  • A glass with a 20ml of water in it.
  • A teaspoon.
Safety: 
Hydrogen peroxide is a mild bleach (which is why its used to make your hair go blond). Be careful with it and don't get it in yours eyes. Best get some adult supervision for this one. And it makes a bit of a mess so do it outside.


What to do.

1. Put about 2 teaspoons of yeast into the glass with the water. Mix it about until it looks like brown muddy water.
2. Squirt about 2 teaspoons of washing-up liquid into the plastic bottle.
3. Pour 50ml of hydrogen peroxide onto the washing-up liquid.


4. Pour the yeasty water into the plastic bottle. Stand back and ...


What's going on?
Remember the chemical formula for water? H2O, meaning water is made from two hydrogens and one oxygen. Well hydrogen peroxide is almost the same except its got an extra oxygen, so its formula is H2O2. But whilst water is very stable (remember how we needed to put electricity through water to break it down in the hydrogen and oxygen), hydrogen peroxide is unstable, it slowly decomposes to water and oxygen. However when the yeast is added to the hydrogen peroxide that extra oxygen gets released really quickly and you end up with loads of oxygen gas (the washing up liquid is just there so that the gas gets trapped in all that foam). 

So why does adding yeast result in the oxygen being released so quickly? Well yeast contains an protein called catalase. It looks like this. 
Catalase is a type of protein called an enzyme. Enzymes1 speed up specific chemical reactions. In this case the reaction is:

2 H2O2 → 2 H2O + O2
Which is just a way of saying that 2 hydrogen peroxide molecules turn into two water molecules plus 1 oxygen molecule. The really astonishing thing about catalase is how fast it works. One catalase molecule can break down 40 million molecules of hyrodgen peroxide every second!

1 The word enzyme comes from the greek ενζυμον, meaning "in yeast". Plus things that speed up chemical reactions are called catalysts, hence the name catalase. So if you follow the etymology of these things you end up going around in circles.


Monday, 11 June 2012

Number 13: Solargraphy

Solargraphy is a way of tracking the suns movement across the sky usually using pinhole cameras. Its really easy to set up but the best images take months to collect, so you need some patients for this one. Its also best to start them when the sun is highest or lowest in the sky. And since we are only a couple of weeks away from the summer equinox (or winter equinox in the southern hemisphere)  now is an ideal time to get your solargraphic cameras ready so they can be deployed on 21st June.

You can collect some absolutely stunning images so its well worth having a go. For example here's six months from my bedroom window. And for more solargraphs take a look at Deigo's awesome collection at solarigrafia.com.

6 Months from my bedroom window

You'll need:

and in six months time you'll need
  • a scanner ( or at a push a digital camera will do)
What to do
1. Cut a small square out of the side of the canister.


2. Cut  a square of tin out of your drink can. The square of tin needs to be significantly larger than the hole in the film canister.


3. Take the pin and gently push down on the tin square. DON'T push it all the way through, you just want to make a dimple on the opposite side of the tin.


4. Turn the tin square over and sand down the dimple.


5. Turn the tin over and gently push the pin in again, turn it back and sand down the fresh dimple. Repeat this 2 or 3 times until you have a very small hole in the tin.


6. Tape the square of tin over the hole in the canister (using the electricians tape). Make sure the pinhole is near the middle of the hole in the canister. 

EDIT: @solarigrafia pointed out that it hot countries you need more tape than I used here otherwise you end up with it melting and the pinhole falling off. So you might want to wrap the tape right around the canister. 


7. Do the next bit in subdued light (I didn't because then I couldn't show you the photos). Cut a section of photographic paper that's about  the circumference of the canister in length by a little under the canister's height. The paper needs to fit neatly inside the canister. Stick the paper to the canister (with the double sided tape), otherwise it rolls up over the course of the exposure. 

TOP TIP: Double and triple check that the paper is the right way round in the canister. The light sensitive side needs to be facing and opposite the pinhole. I've got that bit wrong before and there is nothing more annoying that coming back to the canister 6 months down the line and discovering you've made that school boy error.


8. Put the cap back on the canister and and if you want belts and braces tape it up.


9. Leave the canister facing out of a window, preferably south facing if you are in the northern hemisphere or north facing if you are in the southern hemisphere.

Top tip 2: Try putting your new pinhole camera somewhere overlooking a building site.

10. Wait for 6 months.

11. Take down the canister, open it up and scan the image. It will be a negative so you'll have to invert the image with some processing software. Anyway, I'll talk you through all that in six months time.


What's going on?
Remember the camera obscura? Well the same thing is going on here. Except this time we have some photographic paper to record the image. The pinhole lets in a tiny amount of light and the paper is actually quite insensitive to light (unless you use developing chemicals, which we aren't) so most of the paper needs a really long time to register  any image. But where the light hits the paper directly from the sun the paper is exposed much more quickly so the sun tracks are recorded really well.


We'll have a  chat about the details of the image in  6 months. But in the mean time you can take a look at my other solargraphs the solargraphy project and the solargraph group on flickr.

Now get on with it and we'll take a look at the result around Christmas time.