Showing posts with label experiment. Show all posts

Tuesday, 15 October 2013

Does stainless steel get rid of garlic smells?

This morning a tweet caught my eye
Speculation followed.
But before we get to the 'how' question maybe we should figure our if there is any truth in the anecdotes.

So how about an experiment? And I'll be needing your help for this one.

You'll need
  • A clove of garlic.
  • A knife.
  • A timer.
  • A wooden spoon and a stainless steel table spoon of about the same size.


What to do
1. Wash and dry your hands (so they don't smell of anything to start with).

2. Cut the clove of garlic in half (don't peel it, that way your fingers won't pick up garlic smells when you hold it).

4. Rub the freshly cut surface on the palm of one hand for 10 seconds (use the timer).

5. Rub the second piece of garlic on the palm of your other hand for 10 seconds (this way each hand gets rubbed with a fresh piece of garlic of the same size).


6. Rub one palm with the back of the stainless steel spoon and the other palm with the wooden spoon (the wooden spoon is our control experiment). Again for 10 seconds each. Make sure you remember which hand was rubbed with which spoon.

7. Find a willing volunteer, ask them to close their eyes (with their eyes closed they are less likely to notice any signals from you about which hand has had what treatment).

8. Hold a hand under their chin (that way each hand will be the same distance from the test subjects nose) and ask them to smell it. Then do the same with the other hand.


8. Ask them which hand smelt stronger of garlic.

9. Let me know the results using the survey below. We'll need plenty of tests if we are going to be sure of our results, otherwise it's just more anecdotes.

I'll  get back to you with a conclusion when enough results are in.

Create your free online surveys with SurveyMonkey , the world's leading questionnaire tool.

Monday, 4 February 2013

Number 25: 'DNA' diffraction with a spring and a laser pointer

Photo 51
Time for my second DNA post and I thought I'd take a look at the data that allowed Watson and Crick to work out the famous molecule's structure.

The crucial bit of information came from a photo taken by Rosalind Franklin and Raymond Gosling.  The image is now quite famous and is known as photo 51.

But photo 51 doesn't much look like a picture of DNA. And thats because it is in fact an X-ray diffraction image taken by shining X-rays at a crystal of DNA. Its a bit of a leap from the photo to the DNA structure but luckily there's a really easy way to demonstrate how an image like this comes from a helical structure.

You'll need:
    - a retractable ball point pen
Safety:
Adult supervision required here. Be careful with the laser and don't shine it in anyone/anythings eyes.

What to do:

1) Unscrew the pen and remove the spring. The spring is of course a helix, so its going to act as our model for DNA.

2) Shine the laser through the spring, and then onto a white wall or card about 3 meters away. Best to do this at night with the lights dimmed.

You should see an image on the wall that looks a lot like this.


Which also happens to look a lot like photo 51. And that's because the same processe generates both images.

What's going on:
Both photo 51 and the cross you've just made on the wall are formed by a process known as diffraction. To explain what that is we need to remember that light is a wave.  Now imagine two waves meeting each other. If the waves overlap so that he peaks are in the same place then they combine and the result is a wave that is twice as high. But if the peak of one wave meets the trough of the other they cancel each other out, and in the case of light you get a dark spot (you can also see this happening if you shine the laser at a CD). So some of the laser light that diffracts off the spring interferes with other waves of light giving you a cross and the spots. And from the distance between the spots and the angles of the cross you can work out the shape of the spring (or DNA).

Exactly how its done is explained very nicely here.

And a hat tip to Suzie Sheehy who told me about this fab demo.

Monday, 26 November 2012

Number 22: Burning steel

What do you need to make stuff burn? Just three things, oxygen, a energy source to get it all started and some fuel. These three things are there every time you light a candle or start the engine of a car. The candle wax (or petrol) is the fuel, the match (or a spark) gets is all started and the whole thing is kept going with the oxygen in the air.


So what else can we get to burn? How about steel?

Steel is mostly iron mixed with some carbon and sometimes, other metals (depending on what the steel will be used for) and its not something you'd normally think burns.

You'll need
Safety
This reaction generates a lot of heat (chemists call it an exothermic reaction) and can throw out sparks so make sure there is nothing near by that might catch fire. Have a bucket of water or fire extinguisher handy.  You can also end up with some small particles of steel wool being chucked up and you don't want to get them in your eyes, so wear safety goggles. Make sure there is a responsible adult supervising. Finally, because you get some smoke and sparks produced you should do this outside, you don't want to set fire to the kitchen.

What to do:
1. Fluff up the steel wool a bit. This is to make sure there is plenty of air in amongst it all.
2. Put the wool on the tiles (or whatever it it you are using)
3. Touch the terminals of the battery to the wool.


Almost instantly you'll see part of the wool glowing red hot, very quickly this spreads through the whole clump of wool, consuming it all. Like this:


What's going on:
When you burn things with carbon in them (these are known as organic compounds), like candle wax or fuel in the car, you are reacting the carbon with oxygen to make carbon dioxide gas (which has the chemical formula COmeaning 1 carbon and 2 oxygens). But in this case there isn't any carbon to burn nor are we lighting anything with a flame. Instead the electricity from the battery runs through the steel wool and heats it up. This happens because the electrons and ions that form the electricity collide with other particles that make up the steel wool making them move around, and heat is just the result of particles (like atoms) moving.

The heat speeds up the reaction between the iron in the wool and the oxygen in the air. This would happen anyway, without your help, just much slower (that's why things rust). And this reaction produces heat (its exothermic) which kept the reaction going until you run our of fuel (i.e. the steel wool).

When you burn candles or wood you don't end up with much left over. That's because carbon dioxide is a gas, so it floats away. But when you burn steel wool you end up with iron oxide which is a solid, hence the black stuff that's left over. One more thing,  the chemical formula the iron oxide is Fe2O3 ie. 2 iron atoms (which have the chemical symbol Fe) react with 3 oxygens.

Sunday, 7 October 2012

Number 20: Black Worms

Firework season (in the UK) is approaching so I thought it would be fun to find a simple homemade pyrotechnic. And here it is, 'black worms' made with stuff you're bound to have around the house.


You'll need:
  • Icing or powdered sugar (if you haven't got any already then just wizz some granulated sugar in a food processor).
  • Bicarbonate of soda
  • A pot of sand
  • An alcohol based handwash gel
  • A pot and a teaspoon
  • Matches or a lighter
Safety: 
We're using flames and flammable materials so this is best done outside and with adult supervision.

What to do:

1. Mix 2 teaspoons of icing sugar with 1/2 teaspoon of bicarbonate of soda.

2. Make a small depression in the sand and then spoon the sugar/bicarb mix into it.

3. Squirt the handwash gel all the way around the pile of the sugary mix.


4. Light the gel and watch the snakes grow!


What's going on?

The handwash gel contains ethanol which burns pretty well. This heats up the bicarbonate of soda, which gets converted to carbon dioxide, sodium carbonate and water. Meanwhile some of the sugar starts to burn i.e. it reacts with the oxygen in the air, and ends up as more carbon dioxide and water plus  a whole load of stuff that comes form sugar that didn't burn completely. This is what causes the carmel smell and black sooty stuff.  Then all that carbon dioxide forms bubbles in the caramelised sugar and sodium carbonate which causes it to rise up as those little worm like towers.

Friday, 25 May 2012

Number 12: The world's simplest electric motor

I saw this astonishingly simple motor described over at the fab proton's for breakfast blog and had to have a go.


All you need is:
  • A small stack of 12mm diameter disk magnets (I get mine from emagnets)
  • A 1.5V AA battery
  • A length of stiff but bendable copper wire
  • A penny 

Safety:
The magnets are very strong. Watch out they can fly together and shatter. 

What to do:


1. Stick the magnets onto the negative end of the battery.

2. Place the penny on the top of the battery.
3. Bend the wire so that it balances on the top of the penny whilst the other end only just touches magnets.


4. And watch it spin!


What's going?

When the copper wire touches the magnet a circuit is completed and electricity runs through the wire. When electricity passes through a wire it generates a magnetic field. This then interacts with the magnets at the bottom of the battery (in the same way as opposite poles of a magnet repel each other) and the who thing spins. Hey presto the world's simplest motor.

Thursday, 10 May 2012

Number 11: Grape plasma

We all know about the 3 states of matter, right? There's gases, liquids and solids. Well there's actually more than that (they don't bother teaching you about them in school) and one of them is plasma. It can be made by super heating gases to the point where the electrons get stripped off leaving charged ions and free electrons. Generally you need a lot of heat, like in a star or lightning to make it. Or some clever technology, like a plasma lamps. But it turns out you can also make plasma with a grape and a microwave oven.

Safety:
  1. The grapes get VERY hot so be careful when you take them out of the microwave. 
  2. The process also produces ozone gas, which is poisonous and can cause breathing difficulties. It doesn't produce a lot of it, but you probably don't want to do this experiment to many times. And if you are asthmatic its probably best to just watch it on youtube. 
  3. There is the potential to damage your microwave. I've never hurt mine but just be warned making  3000oC plasma may not do it much good. So ask whoever owns the oven if its OK first.

What you'll need:
  • A microwave oven
  • A grape
  • A knife
  • Kitchen towel
What to do:

1. Cut the grape in half along its equator. Make sure you keep the two halves attached by a bit of skin.


2. Place the cut surfaces on the kitchen towel to gentle dry them.


3. Turn the grapes back over and stick them in the microwave.
4. Turn it on. 


For the sake of this video I've used 4 grapes in one go. I advice you to do it one at a time.

5. When you (carefully) take the grape out you should see that its really pretty singed around the side. Which just goes to show how hot it go.


What's going on?
I have to confess that I'm not sure about this one. And judging from discussions elsewhere on the web there's no clear answer. So if someone would like to chip in and give us an explanation I'd be glad to hear it.

Tuesday, 1 May 2012

Number 10: Polishing the silver

There's all sort of potions and polishes that you can buy to clean up the silver. Don't buy any of them. Because you can find everything you need to get the best cutlery sparking again in your kitchen cupboards.

What you'll need:

  • Bicarbonate of soda
  • Aluminium foil 
  • A cup or glass
  • Some tarnished silver spoon (its best if its solid silver, it will work with silver plated stuff, but you run the risk of removing the plating)


What to do:

1. Put a heaped teaspoon of bicarb into the glass.

2. Tear up 10 to 20 bits of foil and add them to the glass.


3. Put the spoon in the cup
4. Pour on hot water. Water from the hot tap will do fine. 


5.Stir and leave for 5 minutes.

6.Take the spoon out and inspect it. All the tarnish will have disappeared. 


Before
After


What's going on:

There's some pretty niffy chemistry going on here.  First lets dispel a little myth, the tarnish is not due to a reaction with silver and oxygen like a lot of people claim. Iron reacts with oxygen to make rust, but silver tarnish is something different. Silver tarnishes when it reacts with sulfur containing chemicals (usually hydrogen sulfide, which smells like rotten eggs) to produce silver sulfide. Eggs are particularly high in sulfur which is why they make your silver tarnish so quickly.

That's the easy bit. How the aluminium and bicarb work to clean the silver is a little more complicated.

Lets take a look at the chemicals that we start off with. You've got silver sulfide (the tarnish), sodium bicarbonate (the bicarbonate of soda), aluminium  hydroxide (the foil is actually covering in a layer of this, the aluminium itself is underneath and we need to get at it).

Step 1: The bicarbonate reacts with the aluminium hydroxide and turns is back to aluminium.
Step 2: The aluminium reacts with the silver sulfide to make silver and aluminium sulfide.

and that leaves you with nice clean silver.

Tuesday, 10 April 2012

Number 8: Splitting water

If there's a chemical formula we all remember it the one for water, good old H2O;  two hydrogens and an oxygen. Well its really easy to split water up and liberate the hydrogen and oxygen as gases. The process is called electrolysis and all you need is....

What you'll need:
  • One 9V battery (those square ones)
  • 2 lengths of insulated wire
  • A pencil
  • A bowl of water
  • Table salt
  • A box cutter knife


Safety:
Watch out with the knife. Best get an adult to use it.


What to do:
1. First you need to get the lead 1 out of the pencil. To do this its best to carefully whittle the pencil with a pen knife or box cutter.
2. Strip about 2cm of the insulation from both ends of both wires.
3. Take one of the wires and wrap one end around a terminal of the battery and the other end around the graphite from the pencil. Repeat with the other wire. BE CAREFUL not to short circuit the battery by letting a bit of wire touch both battery terminals.
4. Dissolve a teaspoon of salt in the bowl of water.
5. Put the graphite rods into the water.


6. Take a close look at the graphite rods. You should notice bubbles forming on them.


What's going on?
We all learnt at school that water is made up of 2 hydrogen atoms and 1 oxygen atom, so a molecule of water has the formula H2O. But this isn't the whole picture, because in your bowl of water a lot of it isn't actually in the molecular (H2O) form. Instead it splits up into H+ and OH-. These are called ions. The + symbol on H+ means the hydrogen is positively charged because its missing its electron, meanwhile the - symbol on the OHmeans the OH ion is negatively charged because it has gained an electron.

Electricity it basically made up of moving electrons and ions. So electrons flow out of the negative terminal of the battery and in at the positive terminal. In the experiment we've just done the electrons flow down the wire to the graphite electrode and then join up with the H+ , this turns the ion back into molecular hydrogen (H2). Hydrogen is a gas so it forms as bubbles on the electrode.  The opposite happens on the other electrode, here the extra electron on the OHflows up the wire leaving another H+ and molecular oxygen (O2) gas.

You might have noticed that there are more bubbles on one electrode that the other. Thats because there is twice as much hydrogen than oxygen in water, so you also make twice as much hydrogen gas.


What's the point?
Hydrogen could well be the fuel of the future. The idea is that when we run out of fossil fuels we'll be able to replace petrol and oil with hydrogen. And this is how the hydrogen will be made. The only problem is that we need a source of electricity to split the water up and at the moment most of our electricity comes from burning fossil fuels. But if you hook up our setup to a wind turbine or a solar panel then the problem is solved!


1 Actually its graphite, not lead in pencils. And contrary to popular belief pencils never had lead in them. The name comes from 'black lead' which was mined near Keswick in the UK's Lake District. The Grey Knotts mines in the hill around Keswick are the only natural source of solid graphite in the world. Which meant that until an artificially way of making solid graphite rods was invented the lead in every pencil in the world came from Keswick.

Sunday, 25 March 2012

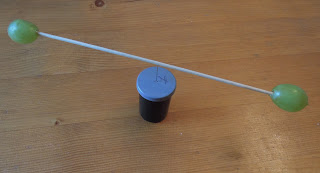
Number 7: The magnetic grape

You remember how in school your teacher told you that only things with iron in them are magnetic; spoons, nails that sort or thing? Well your teacher didn't get that quite right. Because it turns out that  everything is magnetic to some extent. Even grapes. And that's why this happens:


If you want to try this yourself..

You'll need:

  • 2 grapes
  • A wooden skewer (NOT A STEEL ONE)
  • A pin
  • Something to stick the pin through so that it points upwards on a stable base. I used an old film canister, but bit of cork would do just as well.
  • A neodymium magnet. The stronger the better but you probably want one with at least 20 Kg pull.
Safety:
THIS IS REALLY IMPORTANT
The neodymium magnets are really powerful. So...
  1. Don't let kids play with them.
  2. Don't put them near your credit cards, phone, watch or any other electrical equipment.
  3. Don't put 2 magnets anywhere near each other because they'll fly towards one another, shatter and send chunks flying.
  4. If you have any medical implants don't go anywhere near them.
  5. Read the safety instructions that come with the magnets.
What to do:

1. Push the 2 grapes onto either end of the skewer


2. Push the pin through the cap of film canister, so that its pointing upward. Put the cap back on the canister.

3. This is the tricky but. You need to balance the skewer and grapes on the point of the pin. If you get close then adjust the balance by pushing one grape further onto the skewer.


4. Once you've managed that just put the edge of the magnet near one of the grapes and watch them spin.

What's going on?
There are actually numerous types of magnetism. At school we only learn about ferromagnetism. Then there's paramagnets (which are attracted to ferromagnets) and diamagnets (which are repelled by ferromagnets). These 2 types of magnetism are much weaker than ferromagnets so you generally can't see the effect. Which is why you need a set up like this and a powerful magnet to observe it.

Since the water in the grape is diamagnetic its repelled by the strong ferromagnet near it and that makes the grapes spin on the pin. 

You can demonstrate the same principle another way shown here.


Incidentally this effect is central to how MRI scanners in hospitals work.

Thursday, 8 March 2012

Number 5: The rolling can

You can have a lot of fun with static electricity and here's a great example.

What you'll need.

  • A balloon
  • An empty drink can.  It needs to be aluminium. It may have a little sign on it that says ALU or try sticking a magnet to it. If the magnet sticks then its steel, if not then its probably aluminium.
  • A hairy head (without any gel or hairspray) or a woolly jumper (thats a sweater if you are in the USA).


What to do.
  • Blow up the balloon and tie a not in it.
  • Rub the balloon against your hair (or woolly garment).
  • Lie the can down on a flat surface.
  • Hold the bit of the balloon that your were rubbing near the can.
  • The can will roll towards the balloon!

What's going on?
Rubbing the balloon on your hair charges it up with static electricity which makes the balloon negatively charged. When you put the balloon near the can it pushes electrons (which are also negatively charged) to the other side of the can. This makes  the side which is nearest the balloon positively charged. Positive charges are attracted to negative charges so the can moves towards the balloon.

Thursday, 1 March 2012

Number 4: The disappearing O.

Here I've got a really great and surprising example of how your brain makes stuff up.

What you'll need:
Nothing really, just this page. Or you could draw the X and O on a bit of blank paper.


          X                                                                    O                             


What to do:
1) Close your left eye.
2) Look at the X, but pay attention to the O.
3) Slowly move towards the screen.
4) When you are about 15cm or 6 inches from the screen (you'll need to be closer on a small screen) the O should disappear.

What's going on?
The retina at the back of your eyes is covering in cells that are sensitive to light. But at the spot where the optic nerve (which connects your eye to your brain) is attach to the retina there are none of these cells. Any light that falls on this blank patch isn't registered. Which means that when the light from the O hits that spot you don't see it.

So how come we don't notice this blind spot all the time? Well you're brain is pretty amazing, it just makes up some stuff based on what it sees around the blind spot and clones it in the space. There is white space around the O and thats what your brain sticks into the gap. You can see just what a good job your brain does by doing the same experiment on the X below.

Once again close your left eye and pay attention to the sentence 'Nothing missing is there?'. Nothing missing is there?


X                                                 Nothing missing is there?


Tuesday, 28 February 2012

Number 3: The flaming orange

Since we've already got our candle out I thought we'd make more use of it.

You'll need:
  • A candle.
  • Some matches or a lighter.
  • A thick skinned orange (navel oranges work well) or other citrus fruit.
  • A knife.


Safety:
We're using fire again so keep that adult close by and you'd best get them to peel your orange as well.

What to do.
1) Start by peeling the orange. Keep the peel handy, eat the orange.
2) Hold some peel between your fingers and thumb with the orange side facing away from you.
3) Squeeze the peel, you should see little droplets spraying out of it.
4) Light the candle and dim the lights.
5) Now get another piece of peel and squeeze it towards the candle flame.
6) You should see something like this.


Cool ain't it!

What's going on?
Citrus fruit peel is full of an oil called limonene, which is what the droplets are made of. In fact its this stuff that makes the peel smell so nice. Limonene is really flammable, so when you squeeze it into the flame is catches fire and produces that fab flamethrower effect.

Hold on a mo I hear you yell. How come lemon and orange peel smell different if they contain the same chemical that makes them smell? Good question. We it turns out that the limonene in oranges is the mirror image of limonene in lemons and even though they have exactly the same chemical formula our noses can tell the difference.


Monday, 20 February 2012

Number 1: The Film Canister Rocket!

We're going to start with one of my favourites; the great film canister rocket!

You'll need:

  • 1 film canister (you can still get them, try Jessops or anywhere else where they still develop film). The ones white ones with the white lids work best.
  • Lemon juice or vinegar (lemon juice smells nicer, but vinegar works just as well)
  • Bicarbonate of Soda 
  • A teaspoon
  • Some toilet roll
  • SAFETY SPECS!
Safety:
Wear those safety specs and this one is best done with adult supervision. 


What to do.
1) Take everything you need outside
2) Put the safety specs on and keep them on until the end.
3 Take the canister and pour in the lemon juice or vinegar until you have about 1cm worth in the bottom.


4) Take a square of toilet tissue and put it on top of the canister, gently push the tissue into the canister so that you have a small pocket in the top. Make sure the tissue doesn't touch the liquid in the bottom.


5) Next spoon in 1 teaspoons worth of bicarbonate of soda. Then snap the lid tightly back on the canister. 

6) Now you have to be quick! Grasp the canister (keep it at arms length).  Turn the canister over and give it one or two good shakes. Put it, lid down, on a surface. 

7) Stand back and watch it fly!


Whats going on?
The bicarbonate of soda reacts with the acid in the vinegar or lemon juice to produce carbon dioxide gas (and water). As more gas is made the pressure inside the canister builds up, eventually the pressure gets too much and the lid pops off. The gas escapes out and pushes the canister up. 

This is exactly the way that real rockets work (except you can't get to the moon with bicarb and vinegar as a fuel). But your rocket does follow something called 'Newton's third law of motion', which states that "every action has an equal an opposite reaction". In this case this means that the action of the gas escaping from the canister has an opposite reaction which pushes the canister into the air.