 |
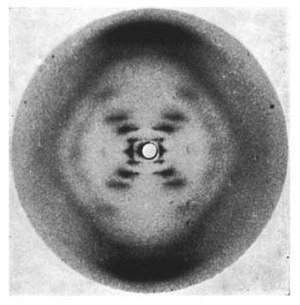
| Photo 51 |
The crucial bit of information came from a photo taken by Rosalind Franklin and Raymond Gosling. The image is now quite famous and is known as photo 51.
But photo 51 doesn't much look like a picture of DNA. And thats because it is in fact an X-ray diffraction image taken by shining X-rays at a crystal of DNA. Its a bit of a leap from the photo to the DNA structure but luckily there's a really easy way to demonstrate how an image like this comes from a helical structure.
You'll need:
- - a laser pointer

- - a retractable ball point pen

Adult supervision required here. Be careful with the laser and don't shine it in anyone/anythings eyes.
What to do:
1) Unscrew the pen and remove the spring. The spring is of course a helix, so its going to act as our model for DNA.
2) Shine the laser through the spring, and then onto a white wall or card about 3 meters away. Best to do this at night with the lights dimmed.
You should see an image on the wall that looks a lot like this.
Which also happens to look a lot like photo 51. And that's because the same processe generates both images.
 |
Which also happens to look a lot like photo 51. And that's because the same processe generates both images.
What's going on:
Both photo 51 and the cross you've just made on the wall are formed by a process known as diffraction. To explain what that is we need to remember that light is a wave. Now imagine two waves meeting each other. If the waves overlap so that he peaks are in the same place then they combine and the result is a wave that is twice as high. But if the peak of one wave meets the trough of the other they cancel each other out, and in the case of light you get a dark spot (you can also see this happening if you shine the laser at a CD). So some of the laser light that diffracts off the spring interferes with other waves of light giving you a cross and the spots. And from the distance between the spots and the angles of the cross you can work out the shape of the spring (or DNA).
Exactly how its done is explained very nicely here.
And a hat tip to Suzie Sheehy who told me about this fab demo.
Exactly how its done is explained very nicely here.
And a hat tip to Suzie Sheehy who told me about this fab demo.


