You can collect some absolutely stunning images so its well worth having a go. For example here's six months from my bedroom window. And for more solargraphs take a look at Deigo's awesome collection at solarigrafia.com.
You'll need:
- A black film canister (or some other light tight container)
- Photographic paper
- Electrical Tape
- modelling knife
- A drink can
- Double sided tape
- A pin or needle
- Fine sandpaper
and in six months time you'll need
- a scanner ( or at a push a digital camera will do)
What to do
1. Cut a small square out of the side of the canister.
1. Cut a small square out of the side of the canister.
2. Cut a square of tin out of your drink can. The square of tin needs to be significantly larger than the hole in the film canister.
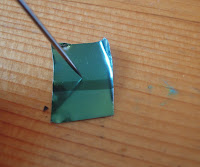
3. Take the pin and gently push down on the tin square. DON'T push it all the way through, you just want to make a dimple on the opposite side of the tin.
4. Turn the tin square over and sand down the dimple.
5. Turn the tin over and gently push the pin in again, turn it back and sand down the fresh dimple. Repeat this 2 or 3 times until you have a very small hole in the tin.
6. Tape the square of tin over the hole in the canister (using the electricians tape). Make sure the pinhole is near the middle of the hole in the canister.
EDIT: @solarigrafia pointed out that it hot countries you need more tape than I used here otherwise you end up with it melting and the pinhole falling off. So you might want to wrap the tape right around the canister.
7. Do the next bit in subdued light (I didn't because then I couldn't show you the photos). Cut a section of photographic paper that's about the circumference of the canister in length by a little under the canister's height. The paper needs to fit neatly inside the canister. Stick the paper to the canister (with the double sided tape), otherwise it rolls up over the course of the exposure.
TOP TIP: Double and triple check that the paper is the right way round in the canister. The light sensitive side needs to be facing and opposite the pinhole. I've got that bit wrong before and there is nothing more annoying that coming back to the canister 6 months down the line and discovering you've made that school boy error.
8. Put the cap back on the canister and and if you want belts and braces tape it up.
9. Leave the canister facing out of a window, preferably south facing if you are in the northern hemisphere or north facing if you are in the southern hemisphere.
Top tip 2: Try putting your new pinhole camera somewhere overlooking a building site.
10. Wait for 6 months.
11. Take down the canister, open it up and scan the image. It will be a negative so you'll have to invert the image with some processing software. Anyway, I'll talk you through all that in six months time.
What's going on?
Remember the camera obscura? Well the same thing is going on here. Except this time we have some photographic paper to record the image. The pinhole lets in a tiny amount of light and the paper is actually quite insensitive to light (unless you use developing chemicals, which we aren't) so most of the paper needs a really long time to register any image. But where the light hits the paper directly from the sun the paper is exposed much more quickly so the sun tracks are recorded really well.
We'll have a chat about the details of the image in 6 months. But in the mean time you can take a look at my other solargraphs the solargraphy project and the solargraph group on flickr.
Now get on with it and we'll take a look at the result around Christmas time.


I love your blog and have entertained and educated my 7 year old son with more than one activity I've found here. One quibble, however. With the popularity of digital photography, film canisters are rarely seen by let alone possessed by the average Joe (I haven't seen one in almost a decade). Future activities that use alternatives would be easier to replicate at home.
ReplyDeleteAgain, thanks for your terrific blog.
Cheers
Thanks for the feedback, I've very pleased you and your son like the blog.
ReplyDeleteGood point about the canisters, most people probably don't know where to find them.
I don't have much of a problem getting hold of them, there are still a few places around that develop film so I just pop in and ask for their empty canisters.
Failing that you can use any light tight container, a tin can works well.
Here's a nice clear video describing how to make a pinhole camera from a oatmeal tin. http://www.youtube.com/watch?v=VfmFw7OHMEs&feature=related
Have a go and we'll compare results at Christmas.
I use film canisters a lot. This is where I get them from. Even though they come from S. Korea they usually arrive pretty quick.
ReplyDeletehttp://www.ebay.co.uk/sch/science-club2000/m.html?_nkw=&_armrs=1&_from=&_ipg=25&_trksid=p3686
Thanks for the tip. I tried to get some directly from fuji but with no luck. Good to know there's a ready supply out there.
ReplyDeleteDo you have any substitute for the film canister? I think it's too small. Well, if you're still trying to do solargraphy, it's okay. But if you had so many small negative films already, be brave and go for a bigger one!
ReplyDeleteYou can use anything that is light tight. I've made solargraphs from an iphone box, a drinking chocolate tub and a tin of mints before. I've even seen one made out of a shed.
ReplyDelete